
How to Transfer Data from iPhone to iPhone: A Complete Switch Records
Share
Transferring records among iPhones has ended up less complicated than ever, way to Apple’s consumer-pleasant features. If you’re switching to a new iPhone, understanding how to transfer data from iPhone to iPhone ensures a clean and secure circulation of your contacts, images, apps, messages, and greater. Whether you use Quick Start, iCloud, or iTunes, this manual will show you all possible ways to migrate your iPhone content effects.
Why Data Transfer Matters
When switching to a new iPhone, maintaining your contacts, pics, documents, apps, and settings is vital. Losing non-public statistics at some stage in migration may be frustrating. Thankfully, Apple’s built-in features offer various methods to ensure a smooth transition.
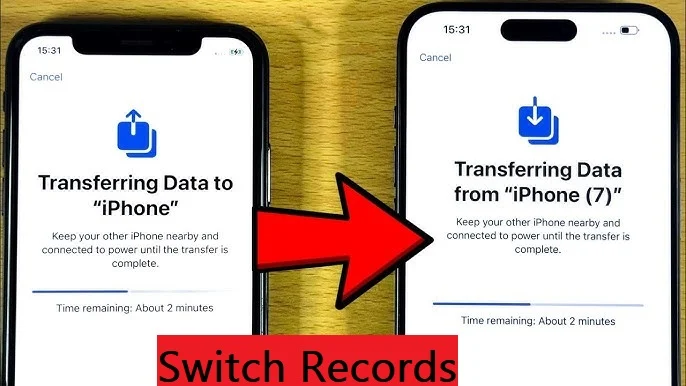
Method 1: Transfer Data Using Quick Start
What is Quick Start?
Quick Start is an Apple function that lets you switch statistics from iPhone to iPhone wirelessly. It works when both devices are close by and linked to Wi-Fi and Bluetooth.
Steps to Use Quick Start
- Turn on the new iPhone and locate it near the old one.
- A Quick Start display appears at the antique iPhone presenting to set up the brand new device.
- Confirm your Apple ID and faucet Continue.
- An animation appears on the new tool — use the old iPhone to scan it.
- Enter the vintage iPhone’s passcode on the new iPhone.
- Choose to switch records from iPhone to iPhone at once or from iCloud.
- Wait for the transfer to finish.
🔒 Tip: Keep each iPhones plugged into power and on the same Wi-Fi.
Method 2: Transfer Data with iCloud Backup
If you backed up your iPhone to iCloud, you could easily restore that backup at some stage in setup.
Steps to Transfer thru iCloud
- On the antique iPhone, go to:
- Settings > [Your Name] > iCloud > iCloud Backup > Back Up Now.
- On the new iPhone, at some point of setup:
- Choose Restore from iCloud Backup.
- Sign in together with your Apple ID and select the present day backup.
- Wait for the transfer to complete.
💡 Note: Ensure both devices have sufficient battery and are connected to Wi-Fi.
Method 3: Transfer Data Using iTunes or Finder
If you pick a wired technique or your internet is restrained, use iTunes (Windows/macOS Mojave) or Finder (macOS Catalina+).
Steps for iTunes/Finder Transfer
- Connect the vintage iPhone for your computer.
- Open iTunes or Finder and click on the device icon.
- Choose Back Up Now.
- Once the backup completes, disconnect the vintage iPhone.
- Connect the new iPhone and pick Restore from This Backup.
- Wait for the process to finish.
🧠 Tip: Use an encrypted backup to encompass Health and Keychain facts.
What Data Can Be Transferred?
| Type of Data | Transferable |
| Contacts | ✅ Yes |
| Photos & Videos | ✅ Yes |
| Messages & iMessages | ✅ Yes |
| WhatsApp Data | ✅ Yes (with backup) |
| Call History | ✅ Yes |
| Safari Bookmarks | ✅ Yes |
| App Data | ✅ Yes |
| Face ID/Touch ID | ❌ No (Reconfigure) |
| Apple Pay Info | ❌ No (Re-enter manually) |
Tips for Seamless iPhone-to-iPhone Transfer
✅ Charge both gadgets fully earlier than beginning the technique.
✅ Update to the brand new iOS model.
✅ Keep Wi-Fi became on for each iPhones.
✅ Don’t eliminate SIM cards till the transfer is whole.
✅ Use an encrypted backup to keep passwords and fitness statistics.
Common Transfer Issues & Fixes
| Problem | Solution |
| Transfer stuck or paused | Restart both iPhones and retry the transfer |
| iCloud backup not showing | Make sure the correct Apple ID is signed in |
| Not enough space on new iPhone | Remove unnecessary apps or choose selective transfer |
| Wi-Fi disconnecting during Quick Start | Move closer to router or switch to a stable connection |
| Apps not downloading | Connect to Wi-Fi and check App Store availability |
Advanced Tip: Transfer WhatsApp from iPhone to iPhone
- Open WhatsApp > Settings > Chats > Chat Backup.
- Tap Back Up Now.
- On the new iPhone, install WhatsApp and confirm your wide variety.
- Tap “Restore Chat History” while triggered.
🔐 Make certain to use the identical Apple ID and phone quantity.
Comparison Table of iPhone Data Transfer Methods
| Method | Speed | Internet Needed | Best For |
| Quick Start | Fast | Yes (Wi-Fi) | Wireless transfer |
| iCloud Backup | Medium | Yes | Restore from cloud |
| iTunes/Finder | Fast | No | Wired, local backup |
When Should You Use Each Method?
- Quick Start: When both iPhones are bodily to be had.
- iCloud: When you want a wi-fi switch and have a reliable backup.
- iTunes/Finder: When internet is confined or if you decide on nearby backups.
Best Practices After Transfer
- ✅ Sign in to iCloud, iMessage, and FaceTime.
- ✅ Re-upload Apple Pay and biometric settings.
- ✅ Check if WhatsApp, banking apps, and video games retained login sessions.
- ✅ Review privacy and area settings.
- ✅ Ensure Find My iPhone is enabled.
Summary
Transferring statistics from iPhone to iPhone can be executed through Quick Start, iCloud, or iTunes/Finder. Each method fits distinct desires and scenarios. With proper guidance, you could thoroughly move your contacts, messages, pics, and app statistics to your new iPhone readily and with minimum downtime.
Frequently Asked Questions (FAQs)
Can I transfer data without Wi-Fi?
Yes, use iTunes or Finder for a wired switch without out net.
Do I want a SIM card within the new iPhone throughout transfer?
It’s not essential in the course of data transfer, however it is required for cellular services.
How long does it take to switch facts from iPhone to iPhone?
Usually between 10–45 mins, depending on information size and switch method.
Will my apps and games transfer too?
Yes, apps will reinstall automatically if downloaded from the App Store previously.


